什么是 Spring Web MVC

Spring Web MVC 是基于 Servlet API 构建的原始 Web 框架。Spring Web MVC 从最初就已经包含在 Spring 框架中。正式名称 Spring Web MVC 来自其源模块 (spring-webmvc) 的名称,但现在通常被称为 Spring MVC,下文也采用这个简写。

和许多的 Web 框架一样,Spring MVC 是围绕着一个前端控制器模式进行设计的。这里围绕着一个 Servlet,它被称为 DispatcherServlet。这里提供了用于处理请求的的共享算法,而实际的工作是由配置的委托组件去执行的。这种模型非常灵活,并支持多种工作流程。

下面将从 Serlvet 注册、IoC 容器创建、Bean 初始化、MVC 的流程这几个方面进行阐述。


Serlvet 注册

Spring MVC 所依赖的 DispatcherServlet 和普通的 Servlet 一样,需要我们通过 Java 代码或者 web.xml文件进行配置。同时 DispatcherServlet 使用 Spring 的配置文件来发现它所需要进行处理程序映射、视图解析、异常处理等工作的委托组件。

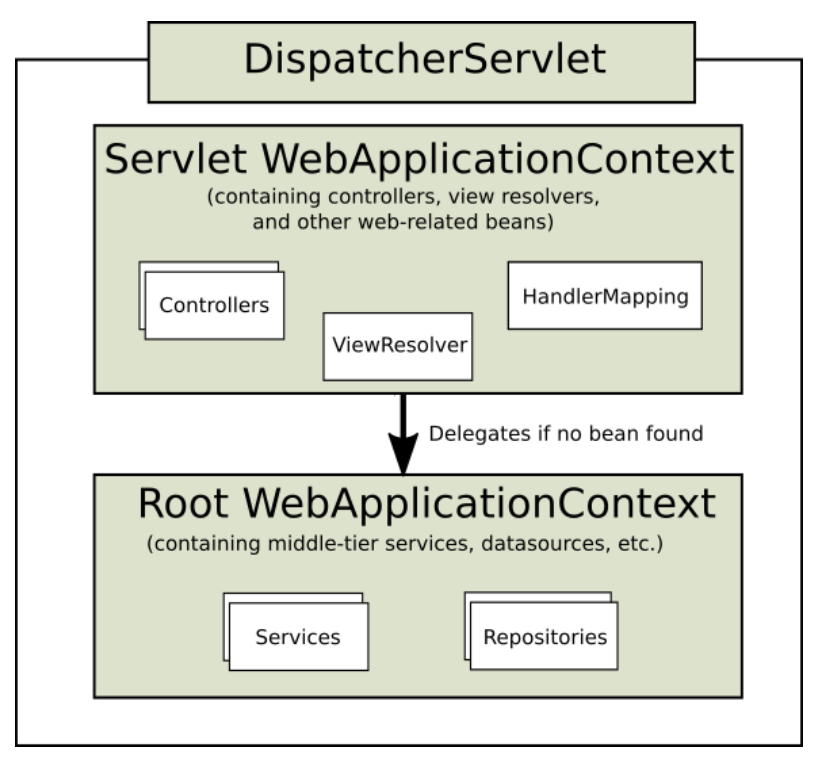
官方为我们展示了两种注册 DispatcherServlet 的方式:

Java 代码(当然你也可以使用 Kotlin,这里就不赘述了)

1
2
3
4
5
6
7
8
9
10
11
12
13
14
15
16
17
public class MyWebApplicationInitializer implements WebApplicationInitializer {

@Override
public void onStartup(ServletContext servletCxt) {

// Load Spring web application configuration
AnnotationConfigWebApplicationContext ac = new AnnotationConfigWebApplicationContext();
ac.register(AppConfig.class);
ac.refresh();

// Create and register the DispatcherServlet
DispatcherServlet servlet = new DispatcherServlet(ac);
ServletRegistration.Dynamic registration = servletCxt.addServlet("app", servlet);
registration.setLoadOnStartup(1);
registration.addMapping("/app/*");
}
}

web.xml 文件

1
2
3
4
5
6
7
8
9
10
11
12
13
14
15
16
17
18
19
20
21
22
23
24
25
26
27
<web-app>

<listener>
<listener-class>org.springframework.web.context.ContextLoaderListener</listener-class>
</listener>

<context-param>
<param-name>contextConfigLocation</param-name>
<param-value>/WEB-INF/app-context.xml</param-value>
</context-param>

<servlet>
<servlet-name>app</servlet-name>
<servlet-class>org.springframework.web.servlet.DispatcherServlet</servlet-class>
<init-param>
<param-name>contextConfigLocation</param-name>
<param-value></param-value>
</init-param>
<load-on-startup>1</load-on-startup>
</servlet>

<servlet-mapping>
<servlet-name>app</servlet-name>
<url-pattern>/app/*</url-pattern>
</servlet-mapping>

</web-app>

有一个这里的小细节,上面的 XML 文件中出现了两个文件路径。

这里的 <context-param> 中的 <param-value> 是对整个 application 的上下文参数。这个是配置在 Web 下面的,Spring 框架在加载配置文件的时候,加载的是 <context-param> 配置文件的内容。

<init-param> 中的 <param-value> 是对 DispatcherServlet 的上下文参数,只有初始化了这个 Servlet,才会加载 <init-param> 中的配置文件。


IoC 容器创建

什么是 IoC

IoC 是 Inversion of Control 的缩写,现在通常被翻译为控制反转

Ioc 是面向对象编程中的一个重要的设计思想。简单来说,IoC 就是将你设计好了的对象交给对应的 IoC 进行控制,而不是传统的在你直接控制对象

既然是控制反转,下面就来说说这控制和反转:

传统面向程序设计,我们直接通过 new 创建对象,是程序主动去创建依赖对象。IoC 则是有一个专门的容器来创建这些对象,即 IoC 容器来控制对象的创建,主要控制了外部资源获取。

有反就有正,传统面向程序设计是由我们自己在对象中主动获取依赖对象,也就是正转。而反转则是由容器来帮忙创建及注入依赖对象:容器帮我们查找及注入依赖对象,对象只是被动的接受依赖对象,所以是反转。

Spring 中的 IoC 容器

Spring中提供了两种 IoC 容器: BeanFactoryApplicationContext

其中 ApplicationContextBeanFactory 的子类,ApplicationContext 是基于 BeanFactory 构建的,功能更强大,下面讲述均为 ApplicationContext

在 Spring MVC 中,IoC 容器为 ApplicationContext 接口。它负责实例化并配置和装配需要托管的对象。容器通过读取配置文件或者代码获取托管对象的描述信息。

1
2
3
4
5
6
7
8
9
10
11
12
13
14
15
16
17
18
19
20
21
22
23
24
package org.springframework.context;

import org.springframework.beans.factory.HierarchicalBeanFactory;
import org.springframework.beans.factory.ListableBeanFactory;
import org.springframework.beans.factory.config.AutowireCapableBeanFactory;
import org.springframework.core.env.EnvironmentCapable;
import org.springframework.core.io.support.ResourcePatternResolver;
import org.springframework.lang.Nullable;

public interface ApplicationContext extends EnvironmentCapable, ListableBeanFactory, HierarchicalBeanFactory, MessageSource, ApplicationEventPublisher, ResourcePatternResolver {
@Nullable
String getId();

String getApplicationName();

String getDisplayName();

long getStartupDate();

@Nullable
ApplicationContext getParent();

AutowireCapableBeanFactory getAutowireCapableBeanFactory() throws IllegalStateException;
}

容器的创建也提供了两种方法:

Java 代码

对于 ApplicationContext 接口,Spring 提供了 ClassPathXmlApplicationContextFileSystemXmlApplicationContext 的实现类来创建你的 IoC 容器。

1
ApplicationContext context = new ClassPathXmlApplicationContext("test.xml");

WebApplicationContext

1
2
3
<listener>  
<listener-class>org.springframework.web.context.ContextLoaderListener</listener-class>
</listener>

在 Spring 中,配置好了监听器,在启动时会创建一个 WebApplicationContext,Spring 初始化的过程中会调用 ContextLoader中的 initWebApplicationContext() 方法生成一个 WebApplicationContext


Bean 初始化

Bean 的定义

在 Spring 中,Bean 是 IoC 容器管理的对象。在 Spring 中,一旦把一个 Bean 放入到 IoC容器之中,这个 Bean 的生命周期就会交给容器进行管理。

一个 Bean 的信息由他的元数据进行表示,下面展示了这些元数据:

属性 描述
Class 指定用来创建 Bean 的类
Name 指定唯一的标识符
Scope 指定创建的对象的作用域
Constructor arguments 它是用来注入依赖关系的
Properties 用于依赖注入关系
Autowiring mode 用于自动装配协作的 Bean
Lazy initialization mode 延迟初始化,第一次被请求时才创建实例
Initialization method 所有必需的属性被设置后,调用回调方法
Destruction method 当容器被销毁时,使用回调方法

Bean 的作用域

定义 Bean 的时候,你需要设置这个 Bean 的作用域,没有设置的话默认值为 singleton

这里可以参考设计模式,常用的作用域为 prototypesingleton,前者为原型模式,后者为单例模式。

Spring 框架支持以下作用域:

  • singleton

    该作用域将 Bean 限制在每一个 Spring IoC 容器中的一个单一实例。该单一实例将存储在高速缓存中,以及所有后续的请求和引用都返回缓存对象。

  • prototype

    该作用域将 Bean 限制在任意数量的对象实例。如果作用域设置为 prototype,那么每次发出请求时 Spring IoC 容器就创建对象的新的 Bean 实例。

  • request

    该作用域将 Bean 的定义限制为 HTTP 请求。只有在 web 应用中才会生效。

  • session

    该作用域将 Bean 的定义限制为 HTTP 请求。只有在 web 应用中才会生效。

  • application

    该作用域将 Bean 的定义限制为 ServletContext。只有在 web 应用中才会生效。

  • websocket

    该作用域将 Bean 的定义限制为 WebSocket。只有在 web 应用中才会生效。
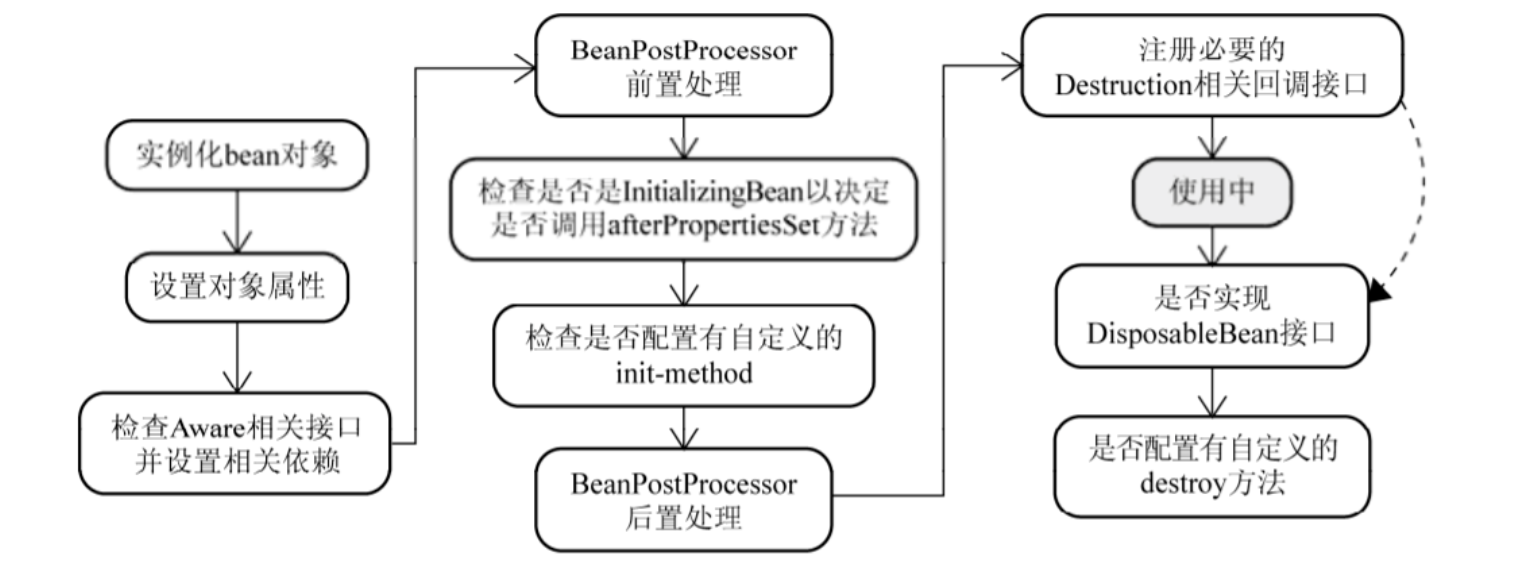
Bean 的生命周期

这里引用一张 《Spring 解密》中的图片,对 Bean 的生命周期进行简单概括,具体细节可以阅读这本书(它真的讲的比我好)。


MVC 的流程

  1. 用户向服务器发送请求,请求被 Spring 的前端控制器 Servelt DispatcherServlet 捕获。这里前端控制器不会自己进行处理,而是对请求进行分发。
  2. DispatcherServlet 对请求 URL 进行解析,得到请求资源标识符 URI。然后根据该URI,调用 HandlerMapping 获得该 Handler 配置的所有相关的对象(包括对象以及对应的拦截器),最后以 HandlerExecutionChain 对象的形式返回。
1
2
3
4
5
6
7
8
9
10
11
12
13
14
15
16
17
18
19
20
21
22
23
24
25
26
27
28
29
30
31
32
@Nullable
public final HandlerExecutionChain getHandler(HttpServletRequest request) throws Exception {
Object handler = this.getHandlerInternal(request);
if (handler == null) {
handler = this.getDefaultHandler();
}

if (handler == null) {
return null;
} else {
if (handler instanceof String) {
String handlerName = (String)handler;
handler = this.obtainApplicationContext().getBean(handlerName);
}

HandlerExecutionChain executionChain = this.getHandlerExecutionChain(handler, request);
if (this.logger.isTraceEnabled()) {
this.logger.trace("Mapped to " + handler);
} else if (this.logger.isDebugEnabled() && !request.getDispatcherType().equals(DispatcherType.ASYNC)) {
this.logger.debug("Mapped to " + executionChain.getHandler());
}

if (this.hasCorsConfigurationSource(handler) || CorsUtils.isPreFlightRequest(request)) {
CorsConfiguration config = this.corsConfigurationSource != null ? this.corsConfigurationSource.getCorsConfiguration(request) : null;
CorsConfiguration handlerConfig = this.getCorsConfiguration(handler, request);
config = config != null ? config.combine(handlerConfig) : handlerConfig;
executionChain = this.getCorsHandlerExecutionChain(request, executionChain, config);
}

return executionChain;
}
}
  1. DispatcherServlet 根据获得的 Handler,选择一个合适的 HandlerAdapter。这里使用了设计模式中的适配器模式,能够更容易的支持多种类型的处理器。
1
2
3
4
5
6
7
8
9
10
11
12
13
14
protected HandlerAdapter getHandlerAdapter(Object handler) throws ServletException {
if (this.handlerAdapters != null) {
Iterator var2 = this.handlerAdapters.iterator();

while(var2.hasNext()) {
HandlerAdapter adapter = (HandlerAdapter)var2.next();
if (adapter.supports(handler)) {
return adapter;
}
}
}

throw new ServletException("No adapter for handler [" + handler + "]: The DispatcherServlet configuration needs to include a HandlerAdapter that supports this handler");
}
  1. HandlerAdapter 将会根据适配的结果调用真正的功能处理方法,完成功能处理。
  2. Handler 执行完成后,向 DispatcherServlet 返回一个 ModelAndView 对象然后调用拦截器的 postHandle 方法。
  3. 根据返回的 ModelAndView,选择一个适合的 ViewResolver(必须是已经注册到 Spring 容器中的 ViewResolver)返回给 DispatcherServlet。
1
2
3
4
5
6
7
8
9
package org.springframework.web.servlet;

import java.util.Locale;
import org.springframework.lang.Nullable;

public interface ViewResolver {
@Nullable
View resolveViewName(String var1, Locale var2) throws Exception;
}
  1. DispatcherServlet 将 ModelAndView 的逻辑视图名发送给 ViewResolver, ViewResolver 将把逻辑视图名解析为具体的 View。

  2. View 进行视图渲染,View 会根据传进来的 Model 模型数据进行渲染。

  3. 返回渲染后的结果。

  4. 执行拦截器的 afterCompletion 方法。

1
2
3
4
5
6
7
8
9
10
11
12
13
14
15
16
17
package org.springframework.web.servlet;

import javax.servlet.http.HttpServletRequest;
import javax.servlet.http.HttpServletResponse;
import org.springframework.lang.Nullable;

public interface HandlerInterceptor {
default boolean preHandle(HttpServletRequest request, HttpServletResponse response, Object handler) throws Exception {
return true;
}

default void postHandle(HttpServletRequest request, HttpServletResponse response, Object handler, @Nullable ModelAndView modelAndView) throws Exception {
}

default void afterCompletion(HttpServletRequest request, HttpServletResponse response, Object handler, @Nullable Exception ex) throws Exception {
}
}
  1. 返回控制权给 DispatcherServlet,由 DispatcherServlet 返回响应,流程结束。

后记

文章中的资料主要来自于 Spring 官网的文档,也参考了一些网络上的资料和书籍。

感谢阅读,如果有什么错误和建议,欢迎与我联系!